How to Generate Off Grid Power using a Car Alternator and an exercise bike.
As a survivalist, being self-sufficient and prepared for unexpected emergencies is paramount. In the event of a power outage or natural disaster, access to electricity can mean the difference between life and death.
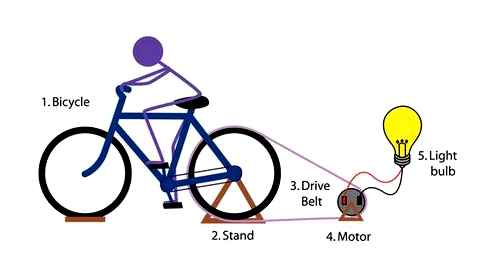
That’s where a DIY pedal-powered generator comes in. By repurposing an old car alternator and a bicycle, you can create a reliable and sustainable source of power to charge your devices and keep your essential appliances running.
STEP 1 : MATERIALS REQUIRED
The materials you need to build this generator include a bike, MDF (medium-density fiberboard) for the base plinth, a magnetic trainer stand for the bike, an alternator, a drive belt, a 12V battery, cable connectors, a 12V socket, a multimeter, a screwdriver, and insulation tape.
The bike serves as the primary power source for the generator, while the MDF provides a sturdy base for the generator to sit on.
The magnetic trainer stand is essential as it provides a way to secure the bike in place while it powers the generator. The alternator is responsible for converting the mechanical energy produced by pedaling the bike into electrical energy, which is stored in the 12V battery.
To connect the components, cable connectors are necessary, while a 12V socket allows you to connect your devices and gadgets to the generator.
A multimeter is used to measure the voltage and ensure the generator is functioning correctly.
STEP 2 : MOUNTING THE BIKE AND THE ALTERNATOR TO A BOARD
To provide a stable foundation for the generator, begin by mounting the rear end of the bike and all the other components onto a sturdy one-inch thick MDF board.
This board provides ample stability and prevents any unnecessary movement during use. In order to accommodate the bike’s rear wheel being placed in a stand, it’s necessary to add an extension to the front of the board.
Can you Pedal Enough Energy to run a Home?
This extension bit compensates for the height difference and ensures that the generator remains level and balanced.
The alternator is a crucial component of this DIY pedal-powered generator, as it is responsible for generating electricity from the mechanical energy produced by pedaling the bike.
Therefore, it is crucial to ensure that it is securely mounted onto the base to prevent any potential accidents or malfunctions.
To mount the alternator onto the base, brackets are used to provide a secure and stable attachment. The bolts connect the alternator to the brackets, and the brackets are then screwed down onto the base.
It is important to ensure that the alternator is bolted down tightly to prevent any movement during operation. As the generator produces electricity, there is a considerable amount of force that pulls the alternator forwards, so it needs to be securely bolted down to prevent any damage to the alternator or other components.
STEP 3 : ALIGNING THE BIKE AND THE ALTERNATOR PULLEY
Alignment is crucial in building a functional pedal-powered generator. To ensure proper alignment, make sure that the wheel of the bike is in line with the alternator pulley.
It is also important to note that different bike wheels have a rim bed and rim walls. To determine the correct drive belt size, measure the internal width of the rim bed.
It is recommended to use a drive belt that fits purely in the rim bed to avoid slipping during pedaling. This will ensure maximum power output and prevent damage to the drive belt or the bike wheel.
It’s essential to ensure that the bike wheel and the alternator pulley are aligned correctly. This is important because if they’re not aligned correctly, the drive belt won’t fit properly and may slip off, causing the generator to stop working.
Therefore, take the time to measure and adjust the alignment before moving on to the next step.
When selecting a drive belt, keep in mind that the belt should fit the internal width of the rim bed and the width and depth of the alternator pulley grooves.
It’s important to get a belt that fits correctly, as a loose or tight belt can cause damage to the alternator and reduce the generator’s efficiency.
Additionally, it’s crucial to ensure that the belt is long enough to wrap around the bike wheel and the alternator pulley. A typical drive belt used in a car won’t be long enough because it’s only designed to go around the pulley on the engine.
A belt that is too short can cause unnecessary strain on the alternator and the bike’s rear wheel, which may result in wear and tear or breakage over time. Therefore, it’s essential to choose the right length of belt to avoid any potential damage and ensure the generator works smoothly.
Can You Really Power With A Bicycle Generator?
Yes. Bicycle generators can produce just enough energy to meet daily requirements at your home. How is that possible?
If you are physically fit, you can pedal fast enough to generate about 100-150 watts. That means continuous pedaling will give you between 100-150watt hours of electric power.
Bicycle generators produce electricity that can be used for powering just any electrical device.
Alternatively, you can use batteries to store the generated for later use in powering lighting systems, laptop computers, cell phones, TVs, radios, etc.
Family members can be involved in pedaling the wheel in shifts. By doing so, you can have a continuous supply of electricity to meet your consumption requirements.

And to ensure a steady supply, a battery bank is needed to store the power. That way, you will not need to pedal the bicycle all day long. Just an hour of work should be sufficient.
How Does The Bike Powered Generator Work?
You must have heard of a rim or tire dynamo attached to the wheel of a bicycle to provide light when cycling at night.
s:
It is nothing different from the bike-powered generator. Dynamos converts the mechanical power produced by the spinning wheel into electricity.
A bicycle-powered generator also works the same way. You need to design a wheel and choose an appropriate unit for generating electricity.
Some people have successfully used old car alternators to make bicycle generators with higher generation power.

The wheel will be turning the alternator or electric motor to generate electricity. The electricity generation inside the unit is a complex process that we will not get into, but it works much like any other electric generator.
Compared to diesel generators, bicycle generators are eco-friendly. They depend on your energy to provide the mechanical power and not diesel or petrol generators.
The input to a bicycle generator is you pedaling the wheels, and output is electricity, which is proportional to the rate of revolutions of the wheel.
Steps To Make A Bicycle Generator
You can make a bicycle generator from locally available materials. As an off-gridder, you don’t have to buy a complete bicycle.
There are 8 steps that you need to carefully follow to make a bicycle generator. Just ensure you have all the materials, tools, and equipment.
Step 1: Preparing Instruments
The very first step is to ensure you have all the materials and tools you need to make a bicycle generator. Gather the following before proceeding:
- Hammer w/Nail Puller
- Saw
- Screwdriver/Screws
- Lightbulb
- Old Fan Belt
- Old Car Alternator
- Switch
- Spanner
- Diode
- Inverter
- Battery
- Voltage Regulator
- Short Plank
- Two 50x6x2 Planks
- One plank (24 Inches)
- Nails (3 Inches in Length)
- L-Corner Braces
- Bendable Metal Bracers/Perforated Plumbers’ Steel
- Old Bike
- Piece of Metal
If you cannot find an old car alternator, you can buy a 24V, 300W electric scooter motor on Amazon.
Electric Scooter Motor
- [Nice Performance]This scooter brushed motor is small brush motor, with bracket, easy to install, high quality for durable use. Powerful, stable working and excellent performance. With small noise, strong torque to ensure the quality of the product.
- [Rated Power]MY1016 24V 250W DC motor: rated power 250W, voltage 24V DC, rated current 13.7A, rated speed 2750RPM, permanent magnet DC high-speed motor.
- [Widely Application]This brushed controller motor is suitable for go karts, scooters, e-bike, atv, motorized bicycle, moped, mini bikes, bikes and electric dirt bikes, ect.
These motors usually come with a toothed chain sprocket for easier connection to the wheel. They are also lighter and more efficient.
Step 2: Remove The Back Tire Off the Bike
You do not need the back tire of your bike unless you still plan to use it on the roads.
To build a bicycle generator, we will be chaining the generator directly to the spinning axial of the back wheel. So, removing the tire and tube inside it will eliminate unnecessary loads on the wheel.
Insert a chisel in between the rim and the tire and then pull the tire edge outwards to remove the tire.
Remove the chisel and place it to the next position a few inches from the first one and repeat the process until you set the tire loose from the rim.
Unbolt the wheel from the frame to set the tire and tube free.
Step 3: Build A Bike Stand And Front Wheel
A stand is needed to elevate your bicycle from the ground and provide support when cycling. The design is up to you.
Create the front bike stand by first cutting the wood into appropriate lengths, about 12 inches should work for many people.
Drill bolting holes into the planks. You also need to create a base for the front stand to support the bike and the cyclist.
The front stand is not necessary if your bicycle frame still has the front wheel intact. You also need to build another stand to hold the back part. The design is also up to you, provided you can come up with a stable stand.
Step 4: Attach The Drive Belt Along The Back Rim
If your bike was still in good working condition, its belt should be enough for connecting the flywheel to the back rim.
Otherwise, visit an auto parts store to buy a new one that will fit your arrangement. Remember, the sizes vary depending on the bike size.
Step 5: Attach The Stand With The Motor
You also need a steady stand for the motor or create a place on the back wheel stand to mount it. The motor or car alternator should be firmly mounted. You can do that using the bendable metal braces or the perforated plumber’s steel.
Screw the power generation unit onto the stand and chain it to the drivetrain of the back wheel if you bought a motor with a teethed sprocket.
If you are using an old car alternator, you should consider a drive belt. That belt should connect the rim to the alternator.
NEW DB Electrical Alternator
- Specs: Unit Type: Alternator, Voltage: 12, Rotation: CW, Amperage: 130, Clock: 10, Pulley Class: S8, Regulator: IR, Fan Type: IF, Brief: 8-GROOVE PULLEY 59mm OD
- Compatible with/Replacement for AC DELCO: 321-1772, 334-2274, ARROWHEAD: AFD0035, CARGO: 112585, FORD: F75U-10300-CA, F75U-10300-CB, F7PU-10346-KA, F7PZ-10346-KA, F7UU-10300-BB, F7UU-10300-BC, F7UU-10300-CB, J N: 400-14138, LESTER: 7791, MOTORCRAFT: GL-373, GL-417, GL-508, NSA: ALT-1719, REGITAR-USA: A250-249N, REMY LIGHT DUTY: 23659, REMY LIGHT DUTY NEW: 92319, VISTEON: AB
- Compatible With / Replacement For: FORD E-SERIES VANS 1997-2001, EXPEDITION 1997-2001, F-150 1999-2002, F-150 to F-350 PICKUP (1972-98) 1997-1998, LINCOLN NAVIGATOR 1998-1999
Pedal-powered machines. introduction
Pedal-powered machines can either be driven directly by the turning pedals, or by electricity generated by the turning pedals. The former is very simple, relying on belts, friction wheels and / or gears rather than motors, batteries or inverters – although they’re used for machines that involve motion, like grinders, blenders or sewing machines (and of course, bicycles!), rather than non-moving or digital kit like lights, laptops or TVs.
Pedal-powered generators have been around since at least the early 1900s, when they were used during WWI to power field radio equipment. You can use a regular bicycle with a generator on a modified training stand (used by cyclists for indoor exercise during the winter). The stand is adapted by replacing the resistance unit (the bit that makes you feel like you’re cycling on the road) with a plate on which a generator is fixed. When pedalling you spin your bike wheel, which spins a roller, and in turn spins a series of magnets in a motor that creates an electromagnetic charge.

It’s like a large dynamo (in other words, a motor in reverse: instead of electrical energy producing mechanical power, it’s mechanical power producing the electrical energy). The generator will produce direct current (DC) – the type of electricity produced by renewable electricity systems or stored in batteries (the other type of current is AC, or alternating current – i.e. mains electricity).
DIY Pedal Generator for Electric Bike or Trike
But a DC current is ‘spiky’ – depending on how hard you pedal, you create different voltages (resulting in very jerky electricity) – anything between 0-60 Volts. Most DC appliances (typically used in caravans or boats) need a smooth 12V, so the voltage needs to be regulated. A regulator can be included in a DC system, and can be set from 0-30V depending on what you’re trying to power.
So let’s say the voltage is set via the regulator to 12V. You can plug in a 12V appliance, pedal away and power it in real time with no battery storage. Or, you could connect an inverter that would allow you to power standard 240V household appliances. Pedal-powered generators can also be used to charge batteries, so that the energy can be stored for later.
However, you can do more work by not generating electricity at all. For example, you couldn’t pedal hard enough to generate enough electricity to power a 600W blender in real time. But you could work the blender directly via a roller on the wheel, connected to the drive shaft with the blender blade on. There are washing machines run directly from pedal power, and even Scalextric tracks.
First of a series of 6 videos on how to build your own bike generator. The rest are here, and here are some more free plans.
What are the benefits of pedal-powered machines?
- Good exercise – but even better, you don’t waste your energy. On a stationary exercise bike all the energy produced is simply wasted as heat. Replace the resistance unit with a generator or a mechanically-driven machine and you can do useful work as you’re cycling …
- … which saves money, obviously …
- … and it also saves all the carbon emissions and pollution associated with the electricity generation that you’ve avoided
- Educational, and can be used by teachers and campaigners to explain electrical and mechanical, as well as environmental topics
- Raises awareness, and helps people question their electricity usage, and the wattage of their appliances; especially good at highlighting the benefits of low-energy lights and appliances, when you have to work to produce that energy
- Very useful in remote situations, or for emergency backup, as it doesn’t rely on the sun or the wind – just on you and a bike
- Easily transportable and storable
- Good for public participation, especially when several bikes are connected together, as you might have seen at festivals
- Festivals! One bicycle can easily power 1000 LED lights, creating an impressive display, or an amp / mike for a singer with a guitar entertaining 50 people. And obviously, the more bikes connected, the bigger light display or sound system can be powered
- Driving machines mechanically is more environmentally-friendly, as there’s no need to manufacture batteries, motors or inverters. Low-tech Magazine looks into this in more detail
You can’t power an entire house via pedal-power. A fit (every day) cyclist may generate an average of 70W for an hour, and 160W in short bursts; and a Tour de France rider can sustain approximately 400W, or up to 1kW peaks! Let’s work with a figure of around 100 Watt-hours from an hour’s cycling. A unit of electricity on your bill is a kilowatt-hour (1 kWh), so you’d be generating one-tenth of a unit of electricity with an hour’s cycling – the value of which would be less than 2p. But you can power small items as you’re using them, and bigger things if there are several cyclists working together; or you can re-charge things like laptops, mobile phones or batteries, whilst exercising.
Even a relatively unfit person could generate around 50W consistently for an hour or so (and of course, the more you do it, the fitter you’ll get). So if you have a 50W TV you could power that directly, and watch it while you’re cycling. You can check the wattage of your appliances by looking for a sticker on the bottom or back of them.
You can power all sorts of things. For an average person, powering a radio is very easy – as is charging your laptop. One person could charge 15 mobiles at the same time. You could run a small stereo, three or four energy-saving light bulbs or a small LED projector with one bicycle.
Maya Pedal – developing all kinds of pedal-powered machines for everyday tasks and for small businesses in rural Guatemala, including making shampoo and grinding coffee.
You can power all these things directly, or you could charge a battery. A 12V leisure battery (used in caravans) is good, and a deep-cycle battery is best of all as it can be discharged more often and more deeply. You can connect an inverter to the battery if you want to power 240V appliances.
Because of the small amount of electricity generated, you might decide instead to power equipment directly, rather than to generate electricity to do the work – to cut out the middleperson, so to speak. Search online for ‘pedal power plans’ to find plans for food blenders, woodworking tools, pumps, drills, potters’ wheels or wool carders, as well as for generators.
You can buy a pedal-powered generator, or make one. It depends on you – are you a DIY person or not? Do you know something about electrics? There are several options to suit all:
- Make the entire generator yourself from recycled parts, if you know how
- Buy a generator and a stand
- Buy a generator and fix it to a stand you’ve already got for exercising
- Put together a DIY DC or AC (mains) kit to use with your generator
- Buy a resistance unit to go with your generator, which contains both the DC and AC kit – then you can just plug anything you like into it and away you go
Комментарии и мнения владельцев
I’m currently looking into off-grid living. I’m hoping to get my electricity from a wind turbine and PVR solar panels that charge a battery. But I will still probably need a generator as back up. I’m looking into as many ways as possible to save energy and to produce more. I wondered if there was a pedal powered solution that could hook up to my battery and top it up on days of low wind and no sun?
Hi Dan, yes – there are a range of ways you can turn your muscle power into topped-up batteries. We can help you by either selling you a turn-key solution or assisting you with a DIY build. You’ve already emailed us so we’ll keep the conversation going there but for others reading this please do get in touch for help!
Tags
World’s first Apple-certified 6-in-1 charger speedily powers six devices
Pedal-electric VM45 velomobile lets riders cruise at almost 30 mph
Sign in to post a comment. Please keep Комментарии и мнения владельцев to less than 150 words. No abusive material or spam will be published.
Funny that, we built a similar set-up for our college open day. 😀 Same frame and everything!http://www.flickr.com/photos/energylabdcu/4130568629/
Who comes up with this stuff?@ 399 for the unit, I would have to pedal 2 hours a day for 30 YEARS for this to make financial sense.Bicycling magazine did an interesting write-up of how similar units actually make sense for gyms, where they are in use for many hours each day, but for a normal person, this is absolutely useless.
@shang:Consider those that pay over a thousand for a non-electricity-generating stationary bike, and this thing makes all kinds of sense.Dan K
strip it down from a wheel stand to a self contained pedal to gen unit. take 10 units, mount them on a chassis and have 10 cyclists onbord. enclose. commute.whoever supplied the least power to the bommute gets to buy drinks after work.
waltinseattle, I like your idea. I had a similar one, using your system as a public transport machine. The more you pedal, the cheaper the fare. By the way, don\’t bother with the generator and motor. Just connect directly to the drive wheels, using a suitable link up between each pedaller. May be a flywheel could be employed, although that would be extra weight. Regarding the original article, I think criminals in prison should be made to generate electicity, if only to power the prison, and save taxpayers money. By the way, did you hear the news the other day? Prisoners complained that they were being charged £1 per week each, to rent TVs in their cells. They won their case, and now only pay £1 per cell if they share with others. It\’s good, isn\’t it?
Actually this idea is being implemented in a City Jail here in the Philippines where the prisoners have mandatory time on a stationary bike to recharge a battery that will power their light bulbs at night. They take turns in doing this, that story can be found here http://newsinfo.inquirer.net/inquirerheadlines/metro/view/20100619-276504/Jail-guards-invention-saves-on-power and it has some photos if you want to see ;)Anyway, they are using an ordinary outdoor bicycle, I think it won\’t last in the long run. Wouldn\’t it be a greater idea if they purchased used stationary bikes instead to cut down on the cost (as some are complaining here) instead of buying a new one? I wonder which stationary bike will have a better output, the recumbent one or the stationary bikes (for those who doesn\’t know the difference visit this site http://www.dogengine.com/used-stationary-bikes.php they have pictures there of different types of stationary bikes), since the recumbent is more relaxed, I personally believe people would have more time using it than the upright ones.Let us not also forget that the actual equipment is a \fitness\ equipment. The power it produces using this method is just something we don\’t want to waste, we are just maximizing its use 😉
Delightfully Seussian, 10 bommuting Seattlites. Like power-generating turnstiles, revolving doors, and sidewalks. Brilliant. Has anyone come up with a way to collect the energy from a spinning clothes dryer to power a washer? or the lights. Do you know?
I purchased this unit and must say that the buyer should beware.The unit works rather nicely, but only after some significant reassembly and research. I considered the unit to be sloppily assembled and slightly incomplete.I paid the surcharge for a new unit, but my generator motor certainly didn’t look new, nor did the mounting plate to which it was attached. The sticker which would have identified the origins and specs of the generator motor clearly had been hastily ripped off the unit. The shipping box itself looked like it had been opened by an overeager ten-year old on Christmas Day, and then repaired with packing tape. Support blamed this on the FedEx shipper. I find that easy to disbelieve.The generator motor was mounted on the wrong side of the plate. There were three photos in the instruction manual (clearly not reversed because they have text content which is not mirror image) which show the motor mounted on one side, but the website shows the generator mounted on the other side. The way it arrived, the generator was delivering positive through the black wire, and negative through the red wire. This color reversal is enough to drive anyone used to wiring components crazy. Worse, the black wire was connected to the negative terminal of the voltage regulator, inviting me to reverse the polarity delivered to the regulator the first time I might use it.- potentially damaging it.I surmised that unmounting the generator, flipping the plate over, and remounting the generator on the rider’s right side would match the instruction manual’s photo, and also change the direction of rotation of the motor, thus correcting the polarity.Support claimed that the generator should be mounted as it was delivered because the mounting screw might eventually become loose. I will take that risk.There were only two screws to mount the generator to the plate, but four holes were drilled. Considering the cost ratio of a couple of screws and nuts to the cost of the unit, this seems a bit sleazy to leave these parts out. They should ship SPARE hardware, not a SHORTAGE of it. Support claimed Two bolts are plenty to hold the unit firmly in place – we have done hundreds of hours of testing and sold many, many units and all this empirical data show that there is no need for 4 bolts. As an environmentally friendly company we attempt to reduce the footprint of our products as much as possible. The savings to us in 2 vs. 4 bolts is so negligible as not to matter to us. My point is, if you drill four holes, and there are four holes on the generator, ship at least four screws if it doesn’t matter. If four screws were not shipped because they do not match the geometry of the generator’s mounting holes, then the plate was sloppily drilled. So this makes me think the company is either into sleazy cost savings or trying to hide their sloppy workmanship.The tension adjuster has to hit the floor for the generator to make contact with the bicycle wheel. I fail to understand why the unit could not be configured (as delivered) to have the tension screw pointing into its reserved position on the base of the bicycle stand, just like the original Bell Motivator bicycle stand’s magnetic resistance unit would mount. I had to mount the screw into a piece of plastic to keep it from wearing a hole into the floor.Clearly this was a modified Bell Motivator bicycle stand. I fail to understand why the magnetic resistance unit that would normally ship with the original Bell Motivator was not included with this unit. The generator provides some resistance, but not a lot. It’s not much of a workout to charge the 35Ah battery we are using.There was no users’ manual shipped with the voltage regulator. It would have been impossible to figure out the regulator without this crucial piece of instruction. Luckily I found the manual via Google. I also found that I could have purchased the identical regulator for half the price I paid to the company that supplied Pedal-A-Watt.Overall, I am happy that I have a working unit. But I think the company’s delivery was sloppy and unprofessional.